DeenOX’s Droid X360 Keypad Mod!
DeenOX shows how to fix perhaps the Droid X360’s greatest design flaw. The original is in Spanish here, or you can read googly translated English here:
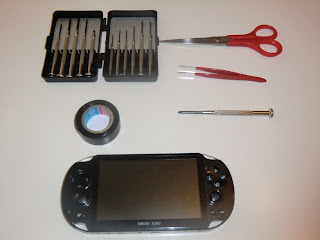
| THURSDAY, AUGUST 16, 2012 Droid X360 D-PAD Simple Mod On the use of this article The original source of this article is at this link . Permission to use the content of this article or any part thereof, provided that the source is mentioned and its original author. I am not responsible for any damage that may occur to any device by trying to follow the instructions in this article. Introduction After writing the article Droid X360 console and see that a problem as silly as the poor design of the D-PAD could remove all the good that can offer that console, I decided to try to find a solution that on one hand it be most crude and simplistic, but otherwise just wanted something that was easy to do for anyone who wants to try it simple with more elaborate solutions. This solution is inspired by the original mod I did at the time to the PSP FAT (which was later known as " Coronita Mod "), that first hit the market they had a problem with the D-PAD and not allowed to perform properly diagonals, but with a very simple change could substantially improve the response of the D-PAD and the overall experience with this console. I encourage anyone with this console who dares to make the change, as it is very simple and is of complexity or modding itself, or open the console. want to clarify that I am not an electronics technician, I have not even understand electronics . I decided to just open the console to show that does not require much technical knowledge to implement a solution of this type. Obviously there will be many other options better than this and with better results, but I believe that I present here is simpler than it occurred to me that I can apply to any user who wants to try. Items needed for Modding.
Watchmaker screwdrivers (for electronics) Procedure Cut two pieces about 3 inches of duct tape
Paste a piece over the other.
Cut thin strips, about 5 ~ 6mm thick (the same thickness as the axes of the D-PAD console
You have to cut about 4 ~ 6 strips. The amount depends on the thickness you want to give the D-PAD to increase the relief to the touch.
At first I put only 4 strips, but I had to put two extras to give more sensitivity. Then glue a strip with another forming a cross. Repeat the process interspersed with vertical horizontal strips to have the 4 ~ 6 strips glued
At the end, we will have a cross with all we've pasted strips Now let's disarm the console. There are 4 external screws on the console:
1 - Among the trigger [L] and [Vol-]
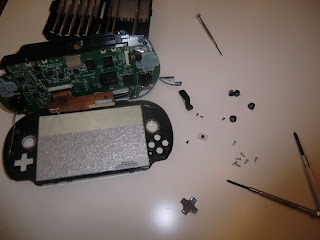
3 - Next to the charger connector To open the console, put your fingernail or a estornillador (carefully) for the space in the [R] or [L] When open, be careful not to pull the speaker wires, and remove the pieces of the buttons (small plate membrane switch) to fully access the console plate.
(Removing the membrane switch)
(This small plate is the emergency stop circuit) Note : It is not absolutely necessary to remove the emergency stop circuit, but it is more convenient to work to lift the plate if it is removed from its socket. The console can be opened like a book console without problems, as shown in the photo. Note : Remove the [L] and [R] to avoid losing by an accidental fall.
Here we see the back of the console. As I mentioned at the beginning, I tried to make this as simple as possible modding. To access the Part D-PAD, simply remove the screws from the right side of the picture above (screws with the numbers 1 to 4), and loosen the screws on the left side of the 5 to 7), and the help of a screwdriver, a little lever on the right side of the picture to lift the plate and, with tongs, remove the part of the D-PAD.
In my case, I have removed all the screws to access the part of the D-PAD.
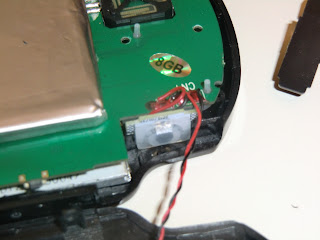
When open, be careful not to pull a lot of the console, not the strips off the screen data.
Now, glue the piece that we created with the duct tape on the back of the D-PAD
Here, we can see the thickness to win the D-PAD with the piece and glued
We put the D-pad in place. If only we have removed the screws on one hand, help us with tweezers to put the piece back in place.
If instead we have removed all the plaque, we'll take special care that the buttons are not misplaced console having rested on the table (I had to open a couple of times the console, some buttons were bad ports , with letter inverted or no contact made as matched). Now we will close again put the screws in the plate. The screws marked in the picture above with the numbers 1 to 4, will serve 3 functions: * To position the plate correctly in the console chassis.
If we push a lot these screws, the D-PAD will have more relief, will be harder to touch but too sensitive to be used in the console. Furthermore, if these screws are tight, the jam begin to stick to the edge of the chassis. Therefore, these screws should be snug, but not overly tight. The Stick should be a good indicator of how they are to tight. If the stick is moved properly without getting stuck, then you should be fine. Before closing the console follow, we will play with your fingers to see if the 4 directional have a similar feel to the touch (not to be one harder than the other). If necessary, re-tighten the screws or remove to access the part of the D-PAD and make necessary corrections. (Here it's a little matter of preference on how sensitive you want it is the D-PAD.'s A bit of trial and error) To continue closing the console, carefully relocating the circuits of the buttons (if any had removed earlier) along with its membrane
We take to put the trigger buttons on the console, taking care to that corresponding to each side: L = Left and R = Right (facing the front console) Now, let's see the differences
Left on D-PAD original when pressed in one direction, and right as it has been now.
You can see now is a little more raised (more like what a PSP when you press the D-PAD)
And the diagonal, left before modding, and right as it has become now.
And the comparison with PSVita
Well, is just try it ... It works! (Although apparently I have to do some adjustment to the left side of the D-pad, which is a little harder than the rest) I hope this guide / tuto be useful for those who want to improve their D-PAD X360 Droid. Zalu2! Deen0X |


Comments
Post a Comment